이번 글에서는 화면 안에서 위젯을 어떻게 이동시키는지 알아본다.
앱을 완성하면 다음과 같이 드래그로 위젯을 이동시킬 수 있다.
위젯을 움직이기 위해 이 앱에서는 Stack, Positioned, GestureDetector를 사용한다.
- Stack : Stack은 children 안에 있는 위젯들을 쌓아 올리는 위젯이다.
- Positioned : Positioned 위젯은 child 안에 있는 위젯이 위치할 곳을 지정해 준다.
- GestureDetector : GestureDetector는 사용자가 화면과 상호작용하는 것을 감지하고 그것에 대한 데이터를 넘겨준다.
위젯 트리는 다음과 같다.
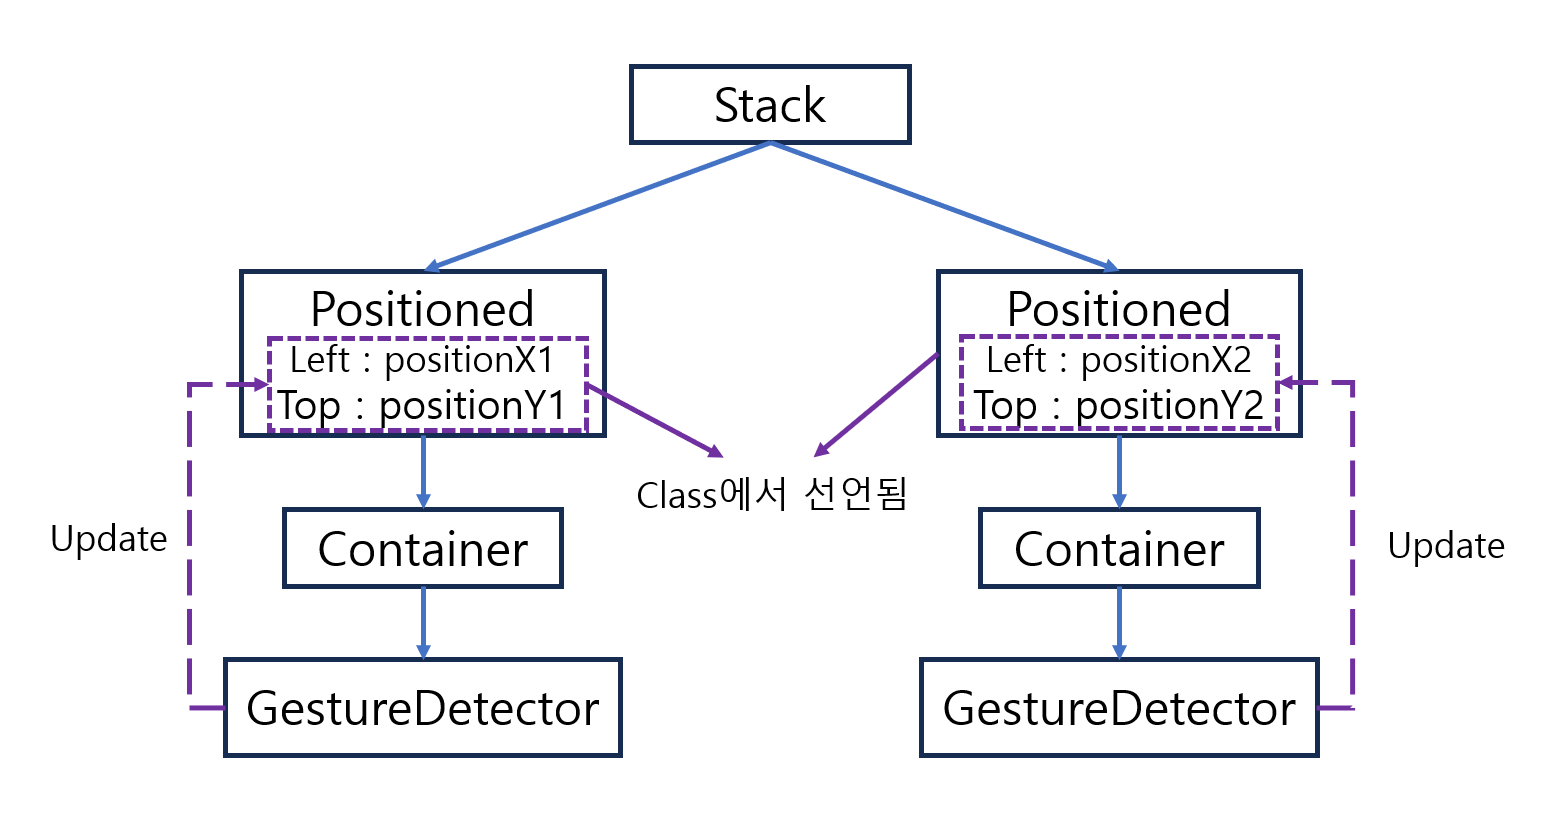
Stack안에 자식 위젯으로 2개의 Positioned 위젯을 가진다.
각각의 Positioned 위젯은 positionX와 positionY를 left와 top 파라미터 안에 넣는다.
positionX와 positionY는 class 안에 선언되며 GestureDetector는 이 값들을 업데이트해준다.
이제 코드를 살펴보자.
import 'package:flutter/material.dart';


void main() {
  runApp(MaterialApp(
    theme: ThemeData.dark(),
    home: Scaffold(
      body: BackScreen(),
    ),
  ));
}
runApp 안에 MaterialApp을 넣어주고, 그 안에 Scaffold를 home 파라미터에 넣어준다.
Scaffold의 body에는 BackScreen 클래스의 생성자를 넣어준다.
BackScreen이 위젯이 돌아다닐 공간이다.
class BackScreen extends StatefulWidget {
  BackScreen({Key? key}) : super(key: key);

  @override
  State<BackScreen> createState() => _BackScreenState();
}
이 코드는 BackScreen을 생성하는 위젯이다.
BackScreen을 StatefulWidget으로 생성한다.
StatefulWidget에 대해서는 다음 글을 참고한다.
2023.06.24 - [단기 프로젝트] - Flutter StatefulWidget - 프로젝트 1_2
Flutter StatefulWidget - 프로젝트 1_2
이 글에서는 flutter의 statefulwidget에 대해 알아본다. 지금까지는 flutter에 대해 알아보면서 StatelessWidget만을 사용해왔다. StatelessWidget은 상태가 없는 위젯으로 한 번 화면에 띄워지면 다시 바뀌지 않
ti-project-11.tistory.com
class _BackScreenState extends State<BackScreen> {
  double positionX1 = 150;
  double positionY1 = 300;
  double positionX2 = 150;
  double positionY2 = 500;
  @override
  Widget build(BuildContext context) {

    return Stack(
      children[],
    );
위 클래스는 BackScreen에 대한 State 클래스이다.
position 각각의 Container가 위치할 곳을 알려준다.
나중에 Positioned 위젯 안에 파라미터로 넣어준다.
다음으로는 build 메서드로 위젯을 그러준다.
반환 값으로는 Stack 위젯을 넣어준다.
children 안에 Positioned 위젯을 넣어줄 것이다.
children: [
  Positioned(
    left: positionX1,
    top: positionY1,
    child: Container(
      width: 100,
        height: 100,
        child: GestureDetector(
          onScaleUpdate: (details) {
            setState(() {
              positionX1 += details.focalPointDelta.dx;
              positionY1 += details.focalPointDelta.dy;
            });
          },
        ),
        color: Colors.tealAccent,
      ),
    ),
    ...
다음은 화면 안에서 움직일 위젯을 나타낸 코드이다.
Positioned의 left, top 안에 앞서 선언해 준 변수들을 넣어주었다.
이 값이 각각 화면에서 왼쪽 혹은 위에서 얼마나 떨어진 위치에 위젯을 위치시킬 것인지 결정한다.
Positioned 위젯의 child로 Container를 넣어준다.
Container는 단순히 네모를 생성하기 위함이다.
width, height 값으로 100을 넣어주고, child로 GestureDetector를 넣어준다.
이렇게 하면 Container의 영여 모두에서 gesture를 감지할 수 있게 된다.
GestureDetector의 파라미터로 onScaleUpdate를 선언해 주었다.
이 파라미터는 사용자가 위젯을 확상, 축소시키거나 드래그하는 것을 감지하여 알려준다.
여기서는 드래그 하는 것만 사용한다.
우리는 드래그가 될 때마다 위젯을 이동시켜야 하기 때문에 감지가 될 때 마다 전체 위젯을 다시 빌드해주어야 한다.
그렇게 때문에 onScaleUpdate의 콜백 함수 안에 setState()를 넣어 위젯이 업데이트될 수 있도록 한다.
setState안에서 positionX, positionY를 업데이트해 준다.
콜백 함수에서는 details라는 파라미터를 받는 것을 볼 수 있는데, 이 안에 모든 정보가 들어가 있다.
details.focalPointDelta.dx는 x 방향으로 얼마나 움직였는지 알려주고, .dy는 y 방향으로 얼마나 움직였는지 알려준다.
이 값을 변수에 더해주어서 드래그한 방향으로 이동할 수 있도록 해준다.
전체 코드는 다음과 같다.
import 'package:flutter/material.dart';


void main() {
  runApp(MaterialApp(
    theme: ThemeData.dark(),
    home: Scaffold(
      body: BackScreen(),
    ),
  ));
}

class BackScreen extends StatefulWidget {
  BackScreen({Key? key}) : super(key: key);

  @override
  State<BackScreen> createState() => _BackScreenState();
}

class _BackScreenState extends State<BackScreen> {
  double positionX1 = 150;
  double positionY1 = 300;
  double positionX2 = 150;
  double positionY2 = 500;
  @override
  Widget build(BuildContext context) {

    return Stack(
      children: [
        Positioned(
          left: positionX1,
          top: positionY1,
          child: Container(
            width: 100,
              height: 100,
              child: GestureDetector(
                onScaleUpdate: (details) {
                  setState(() {
                    positionX1 += details.focalPointDelta.dx;
                    positionY1 += details.focalPointDelta.dy;
                  });
                },
              ),
              color: Colors.tealAccent,
            ),
          ),
        Positioned(
          left: positionX2,
          top: positionY2,
          child: Container(
            width: 100,
            height: 100,
            child: GestureDetector(
              onScaleUpdate: (details) {
                setState(() {
                  positionX2 += details.focalPointDelta.dx;
                  positionY2 += details.focalPointDelta.dy;
                });
              },
            ),
            color: Colors.deepPurple,
          ),
        ),
      ],
    );
  }
}
'플러터 (flutter)' 카테고리의 다른 글
| Flutter를 이용한 Todo 앱 제작하기 (1) | 2023.07.09 |
|---|---|
| Flutter 위젯 생성 및 삭제 (0) | 2023.07.06 |
| Flutter Navigator를 이용한 화면 이동 (0) | 2023.07.02 |
| Flutter에서 비디오 재생하기 -Video player (0) | 2023.07.01 |
| 갤러리에서 이미지를 선택하는 flutter ImagePicker (0) | 2023.06.30 |