저번 글
2023.06.14 - [단기 프로젝트] - 프로젝트1_1. Dart의 기본 (3) - Class
Dart Class - 프로젝트1_1
1. 클래스에 관하여 객체지향 프로그래밍은 코드를 여러 객체로 나누고 그 객체를 모아 프로그래밍을 구성한다. 여기서 객체는 하나의 역할을 수행하는 코드의 모음이라고 생각하면 된다. 클래
ti-project-11.tistory.com
이번 글에서는 저번 글에 이어서 class에 대해 좀 더 알아본다.
추상 클래스와 프라이빗 변수, 제네릭과 스태틱, 케스케이드에 대해 살펴본다.
이전 포스트에 했었던 코드를 다시 보고 시작하도록 한다.
//부모 클래스
class person {
  String name;
  String major;
  List<String> lecture;

  person(this.name, this.major, this.lecture);

  void check_info() {
    print("name : ${this.name}");
    print("major : ${this.major}");
    print("lecture : ${this.lecture}");
  }
}

//교수 클래스
class professor extends person {
  //변수 목록
  String position;

  //생성자
  professor(String name, String major, String position, List<String> lecture)
      : this.position = position,
        super(name, major, lecture);

  //정보 확인 함수 (override)
  @override
  void check_info() {
    print("name : ${this.name}");
    print("major : ${this.major}");
    print("position : ${this.position}");
    print("lecture : ${this.lecture}");
  }
}

//학생 클래스
class student extends person {
  //변수 목록
  String grade;

  //생성자
  student(String name, String major, String grade, List<String> lecture)
      : this.grade = grade,
        super(name, major, lecture);

  //정보 확인 함수
  @override
  void check_info() {
    print("name : ${this.name}");
    print("major : ${this.major}");
    print("grade : ${this.grade}");
    print("lecture : ${this.lecture}");
  }
}

void main() {
  //교수 인스턴스 생성
  professor professor1 = professor(
      "name1", //name
      "Electric engineering", // major
      "assistant professor", // position
      ["electromagnetic", "python 1", "communication system"]); // lecture

  //학생 인스턴스 생성
  student student1 =
      student("name2", "Computer science", "3", ["data science", "AI lecture"]);

  //교수 정보 확인
  print("Check professor");
  professor1.check_info();

  //학생 정보 확인
  print("\nCheck student");
  student1.check_info();
}
1. 추상 클래스
위의 코드를 보면 person 클래스는 인스턴스를 생성하지 않는다.
이러한 클래스는 추상 클래스로 만들어주면 코드를 알아보는데 더 도움이 된다.
굳이 추상 클래스로 만들지 않아도 되지만 추상 클래스로 만들어 주면 상속을 강제할 수 있고, 유지 보수가 용이해지는 장점이 있다.
추상 클래스 안에는 추상 메서드가 선언되며, 추상 메서드는 선언만 되고 기능은 구현되지 않는다.
추상 메서드의 기능은 상속받는 클래스에서 정의해 준다.
abstract class person {
  String name;
  String major;
  List<String> lecture;

  person(this.name, this.major, this.lecture);

  void check_info();
}
추상 클래스의 선언부 앞에는 abstract라는 단어가 붙는다.
abstract는 이 클래스가 추상 클래스임을 알려준다.
2. 프라이빗 변수와 게터 세터
프라이빗 변수는 클래스가 선언된 파일에서만 접근할 수 있는 변수이다.
이 변수는 변수 이름 앞에 '_'를 붙인다. ex) String _name
abstract class person {
  String _name;
  String _major;
  List<String> _lecture;

  person(this._name, this._major, this._lecture);

  void check_info();
}
프라이빗 변수는 클래스가 선언된 파일에서만 접근이 가능하기 때문에 다른 파일에서 접근하기 위해서는 게터(getter)와 세터(setter)가 필요하다.
게터와 세터는 각각 get과 set 키워드를 사용한다.
String get get_major {
  return this._major;
}

set set_major(String major) {
  this._major = major;
 }
다음 게터와 세터를 professor 클래스 안에 넣어주고 main 안에 다음과 같이 써준다.
void main() {
  ...
  //게터 세터 확인
  print("\nBefore setting");
  print(professor1.get_major); //게터

  professor1.set_major = "Computor science"; //세터
  print("\nAfter setting");
  print(professor1.get_major);
}
게터와 세터를 통해 프라이빗 변수를 바꾸고 읽어올 수 있음을 확인할 수 있다.
3. 케스케이드
케스케이드는 인스턴스를 생성하고, 이어서 연속적으로 인스턴스의 메서드나 속성을 사용할 수 있는 기능이다.
다음 예제를 보자.
void main() {
  //교수 인스턴스 생성
  professor professor1 = professor(
      "name1", //name
      "Electric engineering", // major
      "assistant professor", // position
      ["electromagnetic", "python 1", "communication system"]) // lecture
    ..check_info()
    ..set_major = "Computer science"
    ..check_info();

  //학생 인스턴스 생성
  student student1 =
      student("name2", "Computer science", "3", ["data science", "AI lecture"])
        ..check_info();
}
professor 인스턴스를 생성하고 나서, 그다음줄에 '..'이 있고 그 뒤에 메서드와 세터가 호출된 것을 볼 수 있다.
이처럼 케스케이드를 이용하면 생성하고 바로 그 인스턴스의 메서드나 속성들을 사용할 수 있다.
3. 제네릭 과 스태틱
1) 제네릭
제네릭은 파라미터의 타입이 불분명할 때 사용한다.
이를 통해 코드의 재활용성을 높일 수 있다.
예제를 통해 알아보자
우선 이전에 생성한 person 클래스를 다음과 같이 바꿔준다.
abstract class person<T> {
  String _name;
  String _major;
  List<String> _lecture;

  T free_info;

  person(this._name, this._major, this._lecture, this.free_info);

  void check_info();
}
여기서 주목해야 하는 점은 클래스 이름 옆에 붙은 <T>와 'T free_info'이다.
<> 안에 들어있는 T는 타입을 의미하며, 들어오는 파라미터의 값에 따라 타입이 달라진다.
그러므로 'T free_info'는 파라미터로 들어올 T 타입으로 free_info라는 변수를 생성한다는 뜻이다.
생성자에서 free_info로 int 타입의 3의 값이 들어오면 T는 int가 되고, "hello"라는 값이 들어오면 String이 된다.
다음으로는 professor 클래스의 생성자와 check_info 함수를 다음과 같이 바꿔준다.
//professor class
class professor extends person {

...

professor(String name, String major, String position, List<String> lecture,
      free_info)
      : this.position = position,
        super(name, major, lecture, free_info);

  //정보 확인 함수 (override)
  @override
  void check_info() {
    print("name : ${this._name}");
    print("major : ${this._major}");
    print("position : ${this.position}");
    print("lecture : ${this._lecture}");
    print("Free info : ${this.free_info}");
  }

  ...
person 클래스의 생성자가 달라졌기 때문에 super도 그에 맞게 바꿔준다.
또한 check_info에 free_info를 출력하는 줄을 하나 더 추가해 준다.
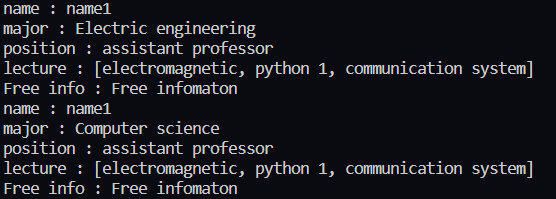
다음으로 main을 다음과 같이 바꿔준다.
void main() {
  //교수 인스턴스 생성
  professor professor1 = professor(
      "name1", //name
      "Electric engineering", // major
      "assistant professor", // position
      ["electromagnetic", "python 1", "communication system"],
      "Free infomaton") // lecture
    ..check_info()
    ..set_major = "Computer science"
    ..check_info();

    ...
실행결과는 다음과 같다.
2) 스태틱
스태틱은 같은 클래스에서 나온 인스턴스가 모두 공유하는 변수나 메서드를 만든다.
class professor extends person {
  //변수 목록
  String position;

  static String school = "ABC Univ.";

 ...
professor 클래스 안에 school이라는 String 타입 변수를 생성해 주었다.
앞에 static이라는 키워드가 붙은 것을 확인할 수 있다.
이는 이 변수가 스태틱 변수임을 의미한다.
main 함수 안에 다음과 같이 쓰면 'ABC Univ.'라는 글자가 프린트된다.
print("professor school : ${professor.school}");
변수가 클래스 자체에 귀속되기 때문에 클래스명을 통해 school에 접근해야 한다.
아래는 지금까지 짠 전체 코드이다.
import 'dart:io';

//부모 클래스
abstract class person<T> {
  String _name;
  String _major;
  List<String> _lecture;

  T free_info;

  person(this._name, this._major, this._lecture, this.free_info);

  void check_info();
}

//교수 클래스
class professor extends person {
  //변수 목록
  String position;

  static String school = "ABC Univ.";

  //생성자
  professor(String name, String major, String position, List<String> lecture,
      free_info)
      : this.position = position,
        super(name, major, lecture, free_info);

  //정보 확인 함수 (override)
  @override
  void check_info() {
    print("name : ${this._name}");
    print("major : ${this._major}");
    print("position : ${this.position}");
    print("lecture : ${this._lecture}");
    print("Free info : ${this.free_info}");
  }

  String get get_major {
    return this._major;
  }

  set set_major(String major) {
    this._major = major;
  }
}

//학생 클래스
class student extends person {
  //변수 목록
  String grade;

  //생성자
  student(
      String name, String major, String grade, List<String> lecture, free_info)
      : this.grade = grade,
        super(name, major, lecture, free_info);

  //정보 확인 함수
  @override
  void check_info() {
    print("name : ${this._name}");
    print("major : ${this._major}");
    print("grade : ${this.grade}");
    print("lecture : ${this._lecture}");
    print("Free info : ${this.free_info}");
  }
}

void main() {
  //교수 인스턴스 생성
  professor professor1 = professor(
      "name1", //name
      "Electric engineering", // major
      "assistant professor", // position
      ["electromagnetic", "python 1", "communication system"],
      "Free infomaton") // lecture
    ..check_info()
    ..set_major = "Computer science"
    ..check_info();

  //학생 인스턴스 생성
  student student1 = student("name2", "Computer science", "3",
      ["data science", "AI lecture"], {1: "info1", 2: "info2", 3: "info3"})
    ..check_info();

  print("professor school : ${professor.school}");
}
'플러터 (flutter)' 카테고리의 다른 글
| Flutter 개발 환경 구축하기 (0) | 2023.06.19 |
|---|---|
| Dart의 동기와 비동기 코딩 (0) | 2023.06.16 |
| Dart Class - 프로젝트1_1 (0) | 2023.06.14 |
| Dart의 기본 (2) - 프로젝트1_1 (0) | 2023.06.11 |
| Dart의 기본 (1) - 프로젝트1_1 (2) | 2023.06.09 |